
Self Taping is becoming the new norm for auditioning actors, especially if your not in a major market such as Los Angeles or New York. It is just another new transition for the industry.
It took me a very long time to figure out the difficulties of Self Taping. Aja does around 4 to 6 self tape submissions a month. They all have different ranges from horrible to excellent. After about 50 of them something had to finally click.
Ideally, I prefer to use her acting coach and have the taping done professionally. In the past her Talent agency, Houghton Talent Agency, use to allow actors to come in to tape. Unfortunately, this became overwhelming for them and they decided to just nix the idea. The reason why I prefer acting coaches is mainly two reason.
- They are experts in script analysis
- much better lighting, video, and audio
These two alone is worth the $25 to $50 session fee. Because what normally would take the coach 30 minutes can take 4 hours for the do it yourself parents. Not much the setup but just merely being the script reader and giving directions to your child. My child prefers to follow directions from her acting coach than her own parents. ?:(
The setup you see in the photo above is something i came up with. Now I don’t have all the professional tools obviously. Here is what I used
- Limo Studio 3 point light
- Cell Phone Tripod
- Ironing Board
- Teddy Bears
- Green or Blue Blanket
I already had 3,4,5 so I had to purchase the lights and tripod. I seriously thought I had to purchase a high end DSLR Camera. It wasn’t until I found this video on Youtube, that finally convinced me to use the Iphone instead. Apparently, the Iphone 6s is one of the best cameras and even some creative Directors are using it to make short films. One even got an official selection at this years SXSW.
It was covered earlier but there are 3 basic things you need to consider when doing self-taping. That is Audio, Lighting, and the Video.
Audio
Filming in a small room will help improve the sound quality and having a cell camera close will be very sufficient. I’ve noticed that I get the best sound in a hallway. In my house the end of the hallway is a bedroom door but I found the lighting was difficult to setup because there wasn’t any room to put the side lights. Bathrooms are very good also.
This is why you sound like Whitney Houston while taking a shower. A large walk in closet has proven to be very good as well. The clothes hanging on the racks do very well in creating the perfect home made sound studio. These are just some of the suggested locations you can use at your house. Do several sound tests with your camera and see what the results are. You can want a very good sound that is very similar to what you hear in movies. Make sure you avoid any background sound and echos of large rooms.
Lighting
The next most difficult thing to crack is getting the lighting perfected. I did lot of research on the 3 point light system. Basically, to keep it simple for the lay person, you need to have one light on each of side of the face and one light shining on the background. This will eliminate that pesky shadow.

One of the best tips I received from an independent filmmaker was to ensure that you was 3 to 5 feet in front of the wall. This creates the required separation from the wall and the subject. Too close and your video will look flat.
Move away and you can see the full dimensions of the self tape audition.
Here is an excellent video that exlained much better on the 3 point lighting system
Video
As previously stated, you do not need a $500 DSLR camera. Your modern cellphone should will be very good. The goal is to have a quality video that show’s child’s eye very well. It should be focused and well lit. You can seriously take a long time trying to figure out white balance or color settings. Colors range from looking too much blue all the way to Yellow. Basically, you need to figure out what temperature your shooting at. You can see the different options when you buy light bulbs. They are different kinds like Day, Soft, or White light. All of them show a different color on the video. Most of the camera’s have auto lighting to make the right amount of adjustment. Make sure you read up on your camera’s video option to help your figure it out.
One of the biggest tip is to make sure your phone is Horizontal

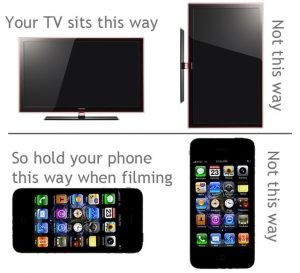
Probably on the biggest gripes from casting is viewing a video taped vertically. It will cut your video. Check out this informative funny video on the subject.
So be sure to get your phone’s on the correct position.
Finally, the camera framing is crucial. 
It’s important that you are focusing on the chest up to the top of the head. The Casting director needs to ensure they have a clear view of your face, especially your eyes. I think I talked about the eyes a lot on self taping. You literally need to be able to see your child’s pupil. The eyes are the windows to the soul and casting director need to see right through them.
Avoid using any props or using too much movement. The frame should be tight and focused on the chest an up. Any hand or body movements probably will not be seen anyways.
The Reader
Well actually there are 4 things you need to consider when self-taping at home. That is the person that is reading the script. This is huge struggle for me since I am not an actor. It is very difficult for actors to portray a role if there is no chemistry with the person they are suppose to be talking too. At the same time the reader should not distract the audition and get more attention than your child who is auditioning. Therefore what I’m saying is that it is more than just reading the words with your child. You need to read as if your playing the role off-camera.
Another tip of the reader is to speak about 2 volumes lower than your child that is being taped. You do want to ensure you have realistic dialogue but at the same time you do not want to be over powering.
Just remember your goal is not to try to be a filmmaker and try to bring the script to life. Your goal is to ensure your child is believable in that particular role. When you first get the sides you need to answer several questions
- Who is this person suppose to be
- What is the message they are trying to say
- How would you say it if you was in that position
90% of time your budding child actor has not experienced anything in the script. So it’s your job as the parent to explain the scenario. For example, If it’s a period piece you might want to research the history. Many times it is actually been quite an eye opener because it allowed me a way to explain many life lessons. Aja has auditioned for bully roles, racism, sexual abuse, diaspora, and many more. These roles really helped create an open dialogue about real life situation.
Indirectly, talking about these touchy subjects has taught her much more than just being a great actor.
In Conclusion
I hope these tips really helped you out. I know it can be a challenge but I promise it gets easier the more you. One thing I didn’t touch on is editing but that is a whole new blog topic for another day. If you like these tips and want to know more, then check out my guide on the Truth about Child Modeling and Acting
Here is some samples of Aja’s audition videos that are now public. Again they show the evolution of DIY self taping.
We been doing this for close to 3 years now and lot of blood sweat and tears creating this. I have about 20 more in my computer and haven’t released them to the public since the movies or shows are not out yet. Hope you enjoy and always free fell to reach out to me if you have any questions.